A simple method of determining the adhesion of a [relevant-to-adsense type=”start”]thin film coating[relevant-to-adsense type=”stop”]
This method of measuring thin film coating adhesion was developed by the Union of German Engineers, (Verein Deutscher Ingenieure, VDI) and is also referred to as the Daimler-Benz test.
Rockwell adhesion test – Adhesion classified 1 to 6
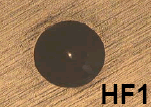
It uses a Rockwell “C”-type diamond cone indenter with an applied load of 150kg. Once the load has been removed the user examines the indent using an optical microscope and classifies the coating adhesion as HF 1 to HF 6 according to the amount of cracking or thin film coating delamination around the indent. Only indents that are classified as HF 1 and HF 2 are regarded as having adequate adhesion. The Rockwell adhesion test is an extremely quick and easy technique. A typical HF 1 indent after the adhesion test is shown below.

Rockwell indent – adhesion classified as HF 1
Rockwell adhesion test – Limitations
The Rockwell adhesion test is influenced by the substrate hardness and the coating thickness. Therefore the minimum substrate hardness should be 54 HRC and the maximum coating thickness that can be accurately tested is 5 microns.

